|
The authorization of users on the server should
be performed after the client ends are configured for operation
with the server.
Start the program on the server. Make sure
that the client parts of the program at users' computers
are also running. Click the Admin. button to open
the Administration window.
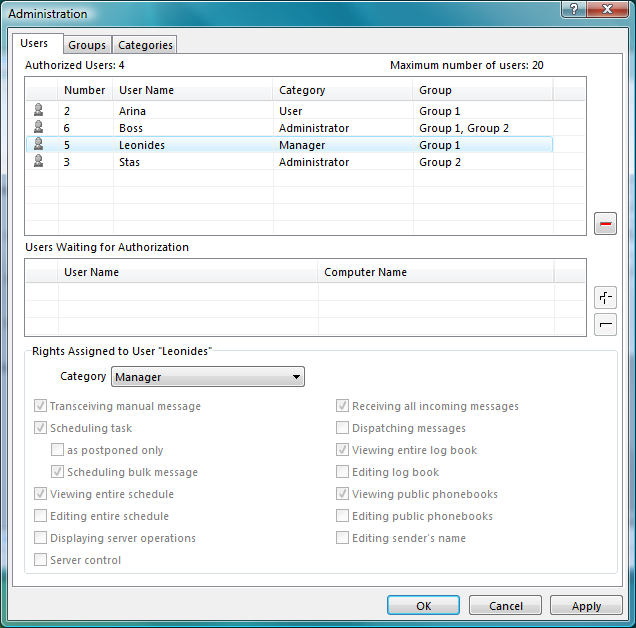
The information about all unauthorized users
is displayed in the Users Waiting for Authorization
table. To authorize a user, select the corresponding entry
of this table. Prior to authorization it is necessary to
assign appropriate rights to the selected user by selecting
an appropriate category for him or her. User rights and
categories are discussed in more detail below.
After the appropriate rights are established,
click the Authorize button. The user record now appears
in the Authorized Users table. The similar operation
can be done for all the rest users. However, the number
of client ends cannot exceed the maximum number of users,
which is displayed at the top of the window. In the Demo
version of the program the maximum number of users is two.
Not only the user name, but also some characteristics
of his or her computer are stored on the server during the
authorization procedure. Therefore some other user cannot
connect to the server under the same user name. This implies
that a repeated authorization procedure is required when
the user changes the computer.
User Rights
User rights are assigned by the server administrator
and can be changed by him or her at any moment. Let's consider
the rights of a user in more detail.
The parameters that define user rights are
grouped in the middle of the window. This group consists
of the following parameters.
Manual message transceiving. Allows
the user to receive and to send messages in manual mode
at the established connection.
Task scheduling. Allows the user to
schedule single messages.
Bulk message scheduling. Allows the
user to schedule a group of messages at once. In other words,
it allows creation of bulk message delivery tasks.
Entire schedule viewing. Allows the
user to monitor the entire schedule. When the parameter
is disabled, only the part of the schedule related to user's
tasks is visible to the user.
Entire schedule editing. When the parameter
is enabled, the user can edit any task of the schedule.
When disabled, only personal tasks can be edited.
All incoming message receiving. When
the parameter is enabled, the received messages are copied
to the user's folder.
Messages dispatching. Allows the user
to copy/move the messages to other authorized users.
Entire log book viewing. Allows the
user to monitor the entire log. When the parameter is disabled,
only the part of the log related to the given user's actions
is visible to the user.
Log book editing. Allows the user to
make changes in the log, for example, to delete records.
Server operations displaying. Allows
the user to monitor a course of a session.
Server control. Enables users to turn on/off the
following server activities from the client end:
- Automated scheduled delivery;
- Automatic sending of email notifications about incoming
messages;
- Automatic reception mode and its options (Announcement,
Fax, Record, Caller ID).
Public phone book viewing. Allows the
user to use public directories.
Public phone book editing. Allows the
user to edit public directories.
In order to simplify users' rights assignment, several
predetermined categories are established. Each of these
categories integrates certain rights, which is convenient
at a large number of users authorization. There are four
conditional categories: the User, the Dispatcher,
the Administrator and the Custom category.
The selection of the first three categories automatically
assigns a corresponding set of rights to the user. These
sets cannot be changed. The selection of the Custom
category allows selection of any combination of rights.
The set of rights that can be granted to each category
is given in the table below.
|
User rights / Category
|
A
|
GA
|
D
|
U
|
|
Manual message transceiving
|
+
|
+
|
|
|
|
Task scheduling
|
+
|
+
|
+
|
+
|
|
Bulk message scheduling
|
+
|
+
|
+
|
+
|
|
Entire schedule viewing
|
+
|
+
|
|
|
|
Entire schedule editing
|
+
|
+
|
|
|
|
All incoming message receiving
|
+
|
+
|
+
|
|
|
Messages dispatching
|
+
|
+
|
+
|
|
|
Entire log book viewing
|
+
|
+
|
+
|
|
|
Log book editing
|
+
|
+
|
|
|
|
Server operations displaying
|
+
|
+
|
|
|
|
Server control
|
+
|
+
|
|
|
|
Public phonebook viewing
|
+
|
+
|
+
|
+
|
|
Public phonebook editing
|
+
|
+
|
+
|
|
|
Editing sender’s name
|
+
|
+
|
+
|
|
User Identification Number
A unique identification number is assigned to the user
after the authorization. This ID number is displayed in
the Number column of the authorized users table.
This number is used afterwards by the program for user identification.
It should be noted that deleting a user from the list of
authorized users and then authorizing him again results
in a new ID number.
Changing Authorized User Rights
To change user's rights, select the corresponding entry
of the Authorized Users table. The Rights Assigned
to User "<User Name>" title will appear
at the user rights group of parameters. Make the necessary
changes in the rights of the user and click the Apply
button.
Repeated User Authorization
The repeated authorization can be required in case of a
change of the user's computer. The data other than those
at the primary authorization will be transferred to the
server from the computer as a result of such a replacement,
thus the user will not be authorized. At the same time such
a user gets included in the list of users waiting for authorization.
If you want to authorize the user repeatedly under the same
identification number (for example, to give the user an
opportunity to keep his or her log and the schedule), select
the user in the Users Waiting for Authorization table
and click the Authorize button. Then give an affirmative
answer to the question to be asked by the program: User
"<User name>" is already authorized. Overwrite?
User groups
Users can be united into groups. For instance, it may be
useful for confidentiality purposes. Users in one group
will not be able to access the information related to other
groups. For example, if a user has the right to view the
entire log book or view the entire schedule, he or she will
only be able to see the part of the log book or the schedule
that pertains only to users in the same group. The only
exception is the users that have administrator's right.
An administrator can view all the information in the log
book or schedule, even if the user does not belong to any
group.
Users can belong to several groups at the same time. In
this case, they will be able to access the information related
to all the groups they are part of.
Other users (those outside any groups) will have access
to all the information according to their rights.
Multi-Line versions allow to assign lines to user groups.
For example, if Group 1 can work with line 1, and
Group 2 can work with line 2, all incoming messages
from line 1 will be available to users of Group 1
only.
Editing groups
Choose the Groups tab in the Administration
window.
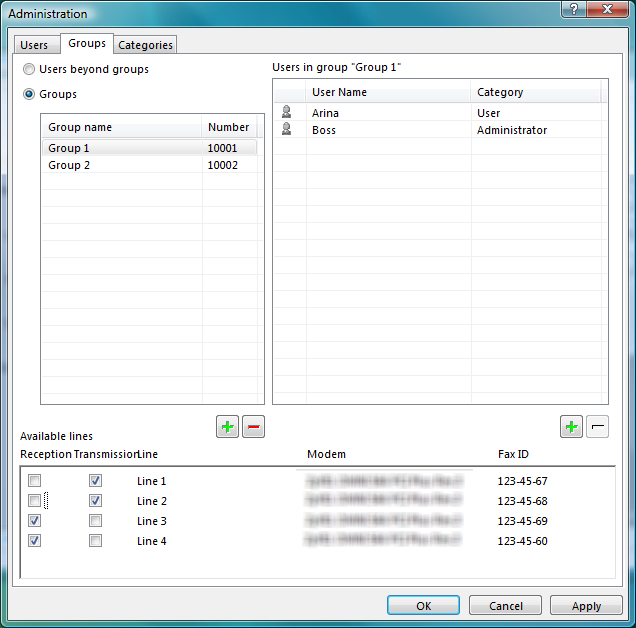
To create a new group, press the  button in the groups list. A new group will be added to
the list. Specify its name and press Enter. If you are using
a Multi-Line version, specify the lines to be assigned to
this the group.
button in the groups list. A new group will be added to
the list. Specify its name and press Enter. If you are using
a Multi-Line version, specify the lines to be assigned to
this the group.
To add users to a group, press the
button under the group users list. Choose the necessary
users in the window that appears and press OK.
To remove users from a group, select them in the group list
and press the  button.
All changes pertaining to user authorization, changing their
rights and editing groups come into force after the Apply
button is pressed or the administration window is closed
by pressing OK.
Additional categories
The predefined set of categories can be extended by custom
ones. This may be useful if you need to authorize a large
number of users with the same rights.
Category creation
Select the Categories tab in the Administration
window.
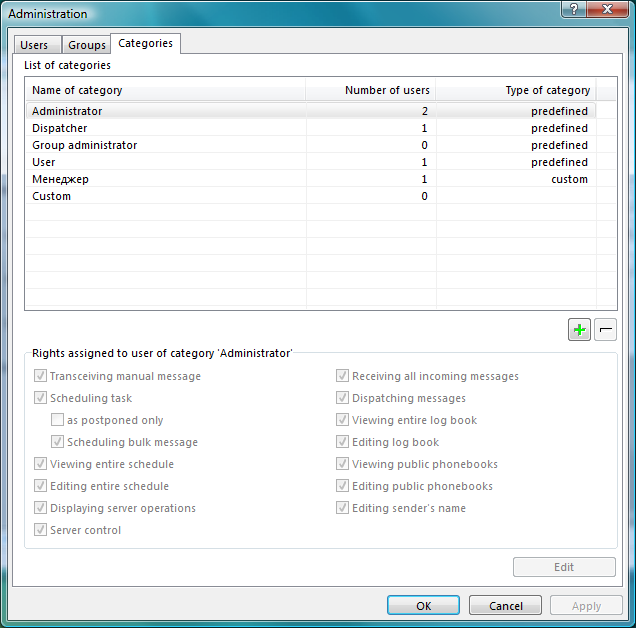
The list of categories is filled with predefined categories
by default. To create a new category, press the
button. Edit the category name and press Enter. After
that, assign rights to this category. A new category should
have a unique set of rights, which means that you cannot
create two categories with the same set of rights. Finish
the process by pressing the Save button.
If you have authorized users with an identical set of rights,
they will be automatically assigned to the created category.
Renaming and removing categories
To rename a category, select it in the list, click the
left mouse button on the category name, edit the name and
finish the editing process by pressing Enter.
To remove a category, select it in the list and press the
button. Removing a category will not change the rights of
those users that belonged to it. The Category field
of these users will change to Custom.
Please bear in mind that you can only rename and remove
user categories.
Editing category rights
You may want to edit category rights to change the rights
of all users belonging to a specific category. Select the
necessary category in the list and press the Edit
button. Edit the category rights and press the Save
button. If this category contains users, the program will
prompt for a confirmation of your intention to change the
rights of all users in this category. If you answer positively,
the rights of all users in this category will be changed.
If a negative answer is given, the rights will remained
unchanged. However, the Category field of these users
will change to Custom.
|